
In today's dynamic technological world, the integration of intelligent assistants, such as GPT-4, with web applications is becoming increasingly popular. GPT-4, developed by OpenAI, offers powerful data analysis capabilities that can significantly enhance the functionality and value of web applications. In this article, we will present a step-by-step guide on how to connect the GPT-4 API to a web application for data analysis.

Of course, connecting such a GPT assistant or another large language model (LLM) based on external servers means that the web application used by the end-user must have access to the external internet.
GPT models from version 3.5 and above are made available via API, but they reside exclusively on OpenAI's servers.
A local solution includes the GPT-2.0 model, available in three weight versions, with the largest XL version weighing about 6 GB. This model is qualitatively weaker compared to version 3.5, but it is suitable for simple tasks. It is worth noting that it supports only the English language.
Another solution is to use LLM models from the website: https://huggingface.com/
These models can be used locally and are trained for various applications.
I will write about deploying local language models (LLMs) and the security of data transmitted to external servers in the next article. For now, I will present a simple way to implement a GPT assistant via the OpenAI API using the Flask framework due to its quick API application development capabilities.
I will also present a practical application of the GPT assistant with a specific example, namely the Omnimes system developed by Multiprojekt.
The discussed system is used for monitoring and managing production in factories and manufacturing plants.
Step 1: Registration and Obtaining API Key
The first step is to register on the OpenAI platform and obtain an API key. This key will be necessary for authentication and communication with the OpenAI server.
- Register on the OpenAI website.
- After logging in, go to the "API" section and create a new API key.
- Note down the API key, which will be used in your application.
Step 2: Setting Up the Web Application Environment
To integrate the GPT-4 API, you need a programming environment for your web application. In this article, we will use an example in Python with the Flask framework.
Installing Flask
If you haven't already installed Flask, you can do so using pip:
pip install Flask
Creating a Basic Flask Application
Create a new file named app.py and add the basic Flask application code:
from flask import Flask, request, jsonify
import openai

app = Flask(__name__)

# Klucz API OpenAI
openai.api_key = 'TWÓJ_KLUCZ_API'

@app.route('/analyze', methods=['POST'])
def analyze():
  data = request.json
  prompt = data.get('prompt')

  if not prompt:
    return jsonify({'error': 'Brak promptu'}), 400

  response = openai.Completion.create(
    engine="text-davinci-003",
    prompt=prompt,
    max_tokens=150
  )

  return jsonify(response.choices[0].text)

if __name__ == '__main__':
  app.run(debug=True)
Step 3: Configuring and Calling the GPT-4 API
API Configuration
In the above code, we configured the OpenAI API key and the /analyze endpoint, which accepts POST requests with JSON data containing prompts for analysis.
Sample API Call
To test our application, we can use tools such as Postman or curl. Here's an example of using curl to send a request:
curl -X POST http://127.0.0.1:5000/analyze \
-H "Content-Type: application/json" \
-d '{"prompt": "Przykładowy tekst do analizy"}'
The application should return a response containing the analysis of the prompt performed by GPT-4.
Step 4: Integration with the Web Application
Next, we need to integrate our endpoint with the frontend of the web application. We can do this using AJAX in JavaScript.
Example Integration with the Frontend
In the HTML file, we add a form for entering text and a button to send data to our endpoint:
<!doctype html>
<html lang="pl">
  <head>
    <meta charset="UTF-8" />
    <title>Integracja GPT-4</title>
    <script src="https://code.jquery.com/jquery-3.6.0.min.js"></script>
  </head>
  <body>
    <h1>Analiza Tekstu z GPT-4</h1>
    <textarea id="prompt" rows="10" cols="50"></textarea>
    <br />
    <button id="analyze-button">Analizuj</button>
    <h2>Wynik:</h2>
    <pre id="result"></pre>

    <script>
      $(document).ready(function() {
        $('#analyze-button').click(function() {
          const prompt = $('#prompt').val();
          $.ajax({
            url: '/analyze',
            method: 'POST'.
            contentType: 'application/json',
            data: JSON.stringify({ prompt: prompt }),
            success: function(response) {
              $('#result').text(response);
            },
            error: function(error) {
              $('#result').text('Wystąpił błąd: ' + error.responseJSON.error);
            }
          });
        });
      });
    </script>
  </body>
</html>
Practical Application of AI Assistant: A Case Study of the Production Management System Omnimes
The following example discusses only the operation of the GPT assistant within the already functioning Omnimes production management system.
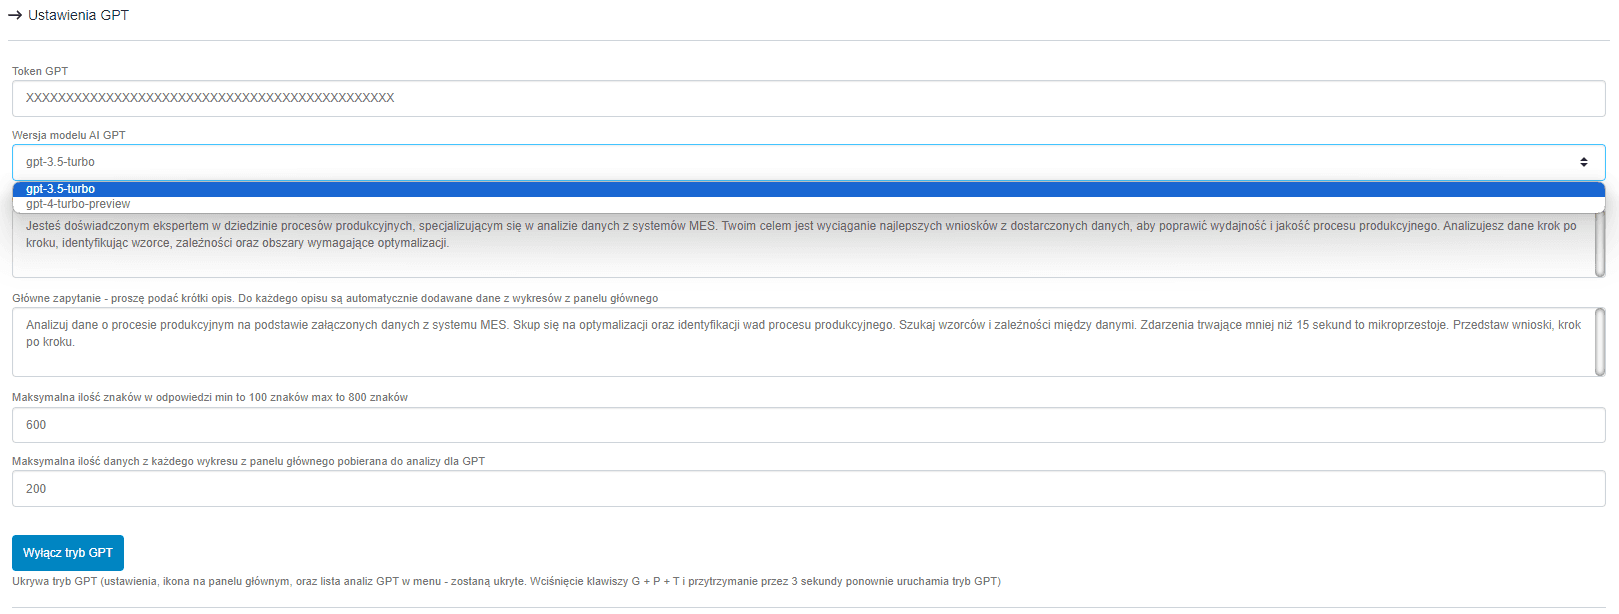
The above image depicts the assistant's settings options. The first field requires the user to input the OpenAI API token. In this example, the user has two model options: version 3.5 and 4. Personally, I recommend using version 3.5 as it is much cheaper. The main difference is that version 4 performs better in longer conversations. In this example, we will ask the assistant one question with provided production data for quick analysis.
The subsequent fields are quite significant. In the first one, we specify the role the assistant should embody. The second field is the main query to be executed. For each query, data retrieved from the summary located on the main dashboard of the system is attached.
The following fields are for limiting the length of the assistant's response and the amount of data sent from the summary.
A neat feature is the ability to hide the GPT assistant mode throughout the entire system.
Querying the assistant involves sending the main query set in the earlier configuration and attaching data from the summary, which the user can create themselves. Below are images from the main panel:
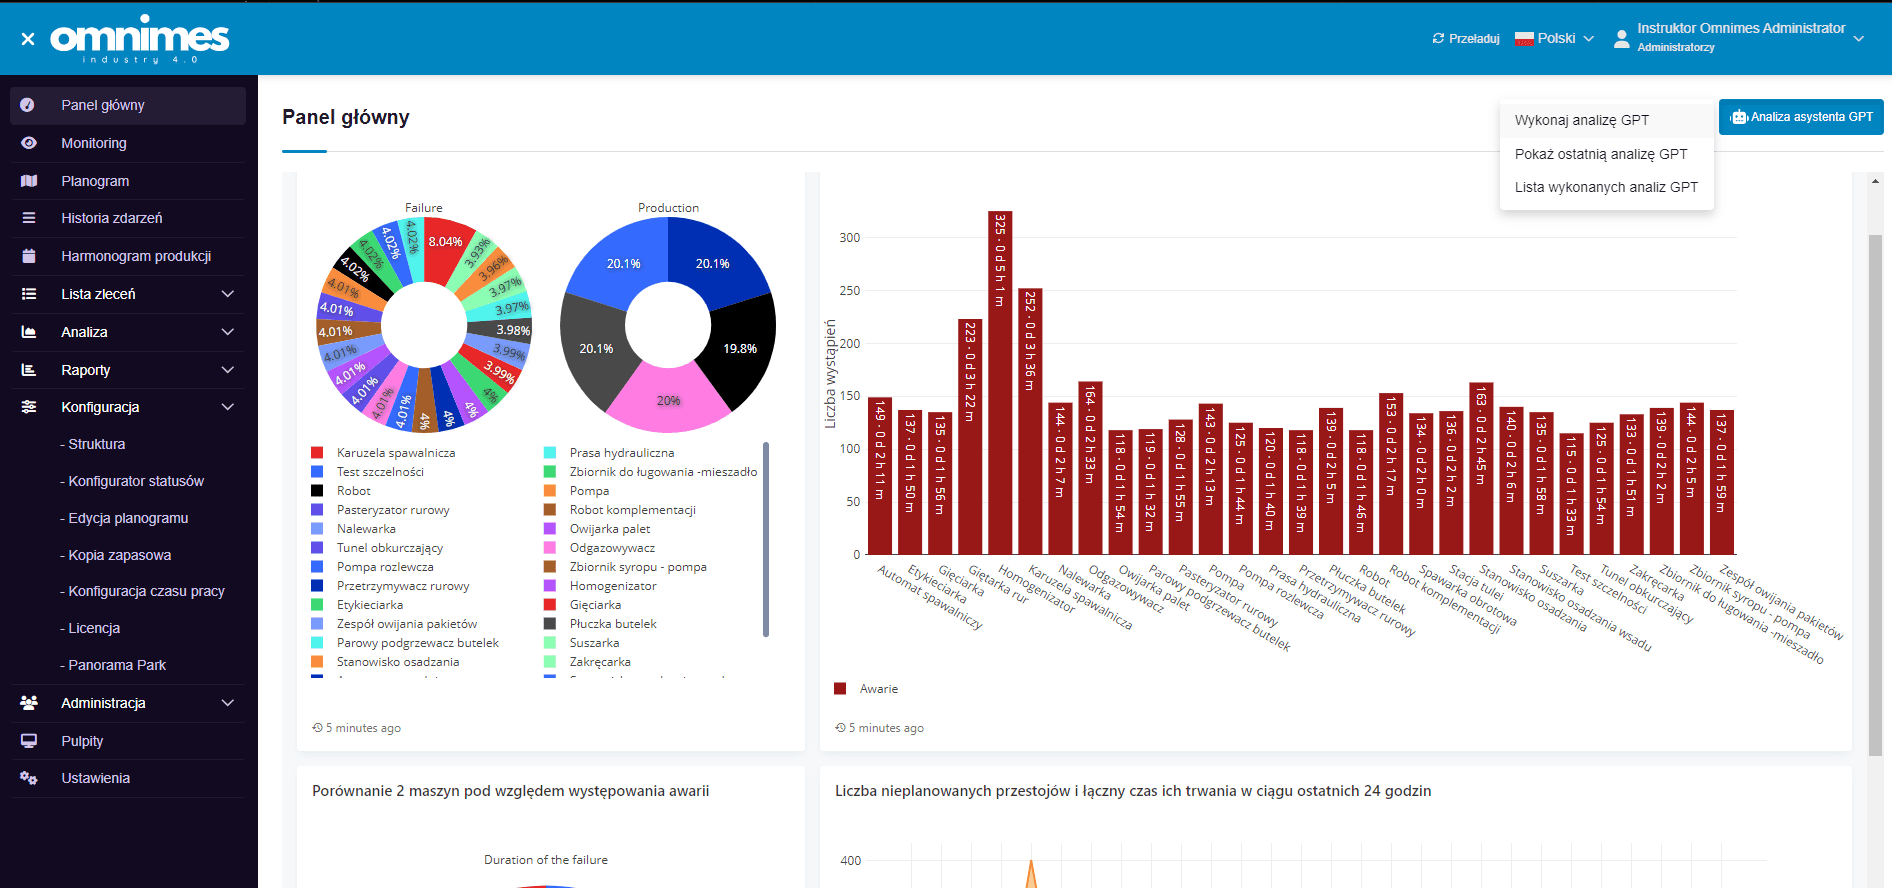
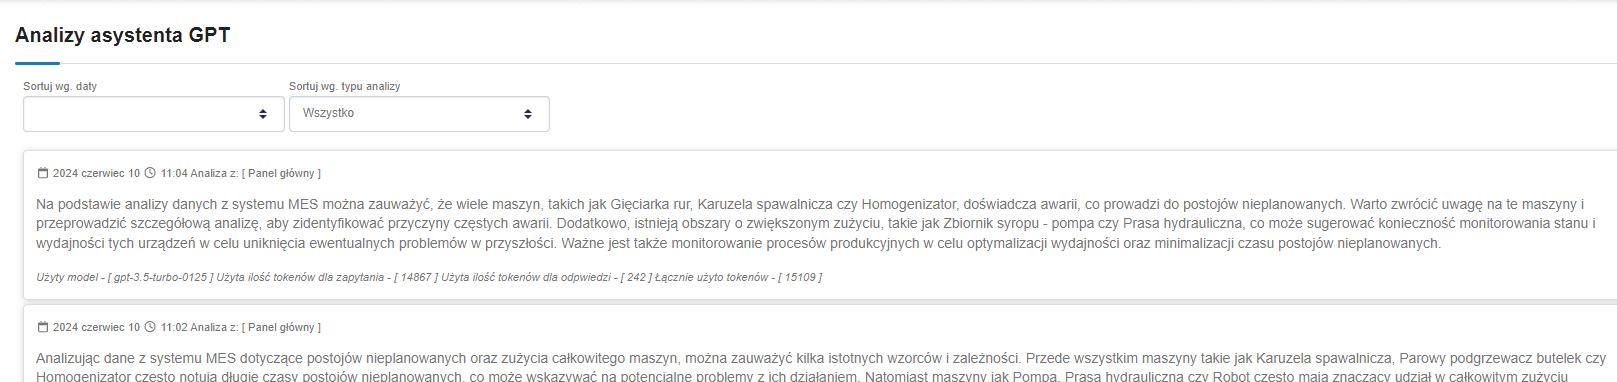
In the top right corner, there is a button for performing the analysis, thanks to which, literally with one click, we will obtain an analysis of the data sent, visible in the charts. Below is the result of the analysis.
A cool application is the ability to browse the analyses performed by the assistant, as well as obtaining information about the used model and the number of tokens used.
Summary
Integrating the GPT-4 API with a web application allows for the utilization of advanced data analysis features, which can significantly enhance the value and functionality of your application. This process involves obtaining an API key, configuring the backend application, and integrating it with the frontend. As a result, users of your application will be able to benefit from the powerful analytical capabilities offered by GPT-4.
However, when using such solutions, the question of data security policy arises.
The answer is simple: it must be taken into account that only a fragment of data is sent to such an assistant, which is extracted from a larger whole, and a single fragment has little value on a global scale.
While justifying with such an argument may be effective, it may still pose an insurmountable barrier in terms of the data security policy of some enterprises.
Therefore, there is the option of deploying an LLM model locally, which I will write about in the next article.